VanCleave #024: Mirage
This experiment has to do with light refraction in the atmosphere. Not only does light refraction change the shape of the sun and location it is also what makes it (and the moon) seem larger when they are closer to the horizon. This experiment is compatible with Classical Conversations.
This is a pretty classic experiment that can even be simplified with a straw in water. If you have time, drop a pencil in the water and take a look!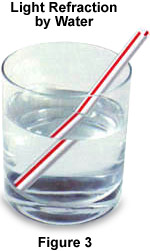
Reference: https://micro.magnet.fsu.edu/optics/lightandcolor/refraction.html
I like the “magic” of this experiment as the coin appears to jump back into view as the water is added!! Neat!! Light particle or photons are tiny particles that move through space. They travel at different speeds in different environments, just like we run faster on land and slower in water or even slower in quicksand! When light changes speeds, i.e. goes from air to water or water to air, it changes directions. Believe it or not light travels about the same in space (a vacuum, no air) as it does in air, but it slows down in water. When light travels through the atmosphere, the thicker the atmosphere, the slower the light. When the sun is at the horizon, there is enough atmosphere to slow the light just enough to make the sun appear to rise a bit early or set a bit late.
Now for some questions:
- What are the steps of the Scientific Method?
- Why kind of hypothesis do we want to use (ex. a yes/no question or IF/THEN statement)?
- What are the materials?
- What is the procedure?
- Did the coin move?
- What made the coin appear to move?
- What are some differences between water and air?
- Would this work with a different coin?
- What would happen is the water was emptied?
- Has anyone seen the sun “hovering” above the horizon at sunset or sunrise?
Reference: http://epod.usra.edu/blog/2011/05/color-of-the-setting-sun.html
VanCleave #026: Distortion
This experiment is a direct tie in with #024, it is all about how the sun’s rays travel through the atmosphere. This experiment is compatible with Classical Conversations.
If we stay in our backyard from just before sunrise until just after sunset we would be able to witness the sun travel across the sky (is that entirely accurate? Who is doing the traveling? Oh yeah, the earth!) at least from our perspective! As the Earth rotates we view the Sun through different parts of the atmosphere. In the drawing below you see kids standing on the Earth. OK, this is really, really, REALLY not to scale but it is to show how the Sun’s rays travel through different amounts (distances) of the atmosphere during the day. The green circle is the Earth, the blue area is the Atmosphere and the Sun are the yellow objects above the Atmosphere. Again, it is easier to “move” the Sun for the purpose of understanding.
During Mid-day, the Sun is directly above our friends and the Sun’s rays travel Distance “S” (red arrow between two black lines) through the Atmosphere. It is the shortest distance and the amount the light photons in the Sun’s rays bend is lowest and the Sun appears smaller at Mid-day. During sunrise or sunset the Sun’s rays travel Distance “L” (red arrow between two black lines) through the Atmosphere. It is the longest distance and the amount the light photons in the Sun’s rays bend towards the earth is greatest and when light bends, the shape we see changes, in this case bigger and kind of squished. So the Sun looks bigger when viewed through thicker layers of the Atmosphere. How does this relate to our experimental set-up? Keep reading!!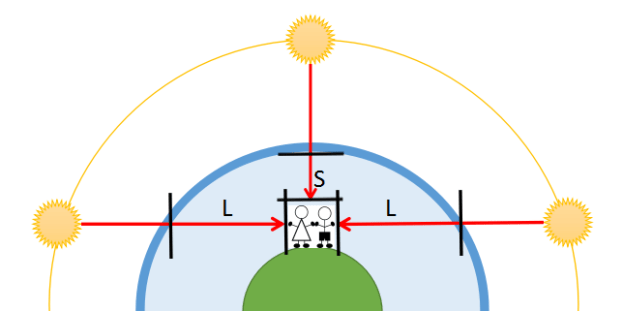
Since we can’t take our kiddos up to the upper atmosphere we use a magnifying glass to simulate the effect. The magnifying glass lens (plastic or glass) is made just for, well magnifying. This means that the lens has a convex shape and it thickest in the middle and thinner at the edges. This website does a good job explaining it for kids. The light is bent in the middle and makes the image of the object, in this case the circle, bigger. If you move the magnifying lens you can “warp” the shape of the circle as the light travels through the different thickness in the lense. And it is this “warpness” that make the sun and moon look bigger on the horizon and then as the sun sets it appears to flatten as the light bends most of all and “warps” the last bit of the sun to the max!
Tips for making the experiment a success:
- Print out a circle image, or more than 1, to have handy during science time, drawing with a compass takes some skill and time and it is not critical to the intent of the experiment. Some kids (and tutors!) may get frustrated.
- Move the magnifying glass slowly back and forth, this e can be subtle.
- If your magnifying glass is big enough you may be able to feel the thickest part of the lens in the middle.
A few questions:
- What are the steps of the Scientific Method?
- Why kind of hypothesis do we want to use (ex. a yes/no question or IF/THEN statement)?
- What are the materials?
- What is the procedure?
- What are some other devices that use lenses? Telescope, microscope, binoculars, etc.
- Anyone wearing glasses?
- Has anyone seen how light bends in a magnifying glass but instead of using it to magnify, you can see the light being focused or “concentrated” on one spot?
- The more lenses you put together (in the right configuration) you can see very far away or separate out each color of the visible light spectrum, like a “rainbow” from a crystal or like the atmosphere does with water drops to make a rainbow in the sky!
- Week 8, Science: What some parts of the sun?
- Week 10, Science: What are the phases of the moon?
- Week 22, Science: What are three characteristics of light?
Speaking of the light of the moon: This really cool thing is happening tonight!! (August 12, 2016)
